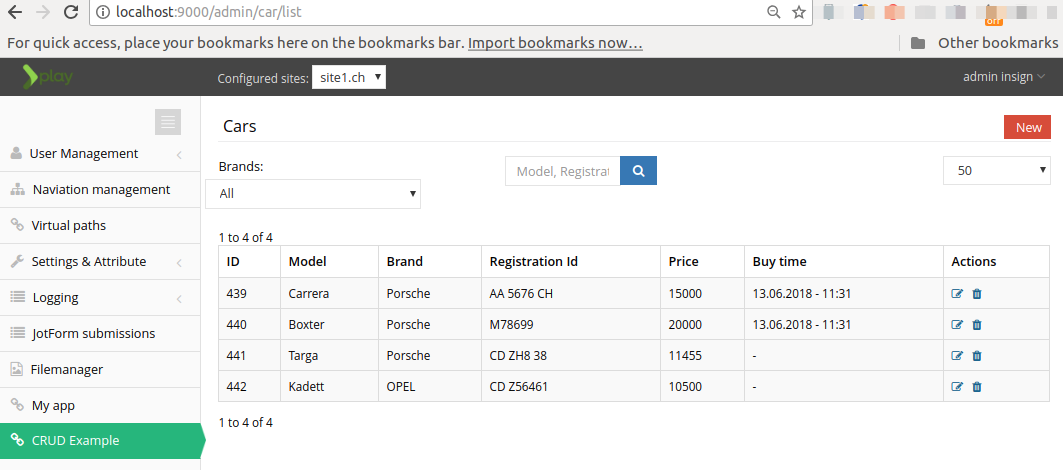
In this tutorial you will implement a basic CRUD application to display a simple list of cars with their brands.
You will create the following pages:

1. Create Domain Objects
First, you will need to identify your domain objects and relationships between them.
By just looking at the cars list page you can easily translate it into a "Car" class with the following properties: id, brand, buyDate, model, price and registrationId.
Also note that a car brand is selectable on the edit page, so how would you model it? The simplest way to model a car brand select input is just by hardcodding it into HTML as a set of select options and this is just fine if you know all the values upfront. But if you don't know all car brands or you simply don't want to provide them all upfront or you want to be able to add new brands easily, you can extract a car brand into it's own class, let's simly name it "Brand".
Here's the UML class diagram of your domain model:
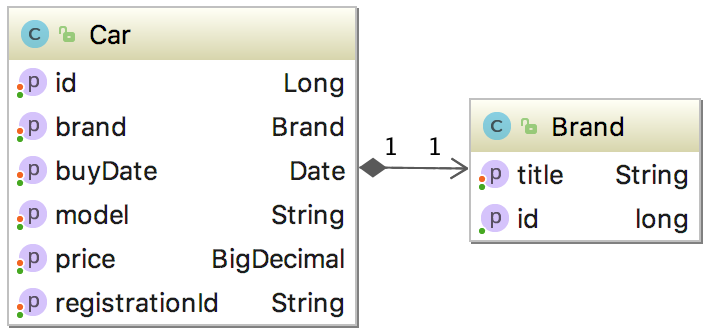
Usually at this point you would implement Car and Brand classes with JPA annotations, then you would create a CarRepository class which will be responsible for persisting Car objects, and finding them by different criterias. But in this tutorial you will simply extend `ch.insign.commons.db.Model` class which already implements some boilerplate for you.
So here's the `Brand` JPA entity:
package crud.models;

import ch.insign.commons.db.Model;
import play.data.validation.Constraints;

import javax.persistence.Entity;
import javax.persistence.Table;

@Entity
@Table(name = "example_crud_brand")
public class Brand extends Model {
    public static BrandFinder find = new BrandFinder();

    @Constraints.Required
    @Constraints.MaxLength(value = 48)
    private String title;

    public String getTitle() {
        return title;
    }

    public void setTitle(String title) {
        this.title = title;
    }

    /**
     * BrandFinder class. Contains methods to find brands from the database.
     */
    public static class BrandFinder extends Model.Finder {
        BrandFinder() {
            super(Brand.class);
        }
    }
}
And here's the `Car` JPA entity:
package crud.models;

import ch.insign.commons.db.Model;
import com.uaihebert.model.EasyCriteria;
import play.data.format.Formats;
import play.data.validation.Constraints;

import javax.persistence.*;
import java.util.Date;

@Entity
@Table(name = "example_crud_car")
public class Car extends Model {
    public static CarFinder find = new CarFinder();

    @Constraints.Required
    @Constraints.MaxLength(value = 48)
    private String model;

    @Formats.DateTime(pattern = "yyyy-MM-dd HH:mm")
    @Temporal(TemporalType.TIMESTAMP)
    private Date buyDate;

    @Constraints.Required
    @Constraints.MaxLength(value = 10)
    private String registrationId;

    @Constraints.Min(value = 0, message = "example.crud.car.price.error.message")
    private float price;

    @ManyToOne
    private Brand brand;

    public float getPrice() {
        return price;
    }

    public void setPrice(float price) {
        this.price = price;
    }

    public Brand getBrand() {
        return brand;
    }

    public void setBrand(Brand brand) {
        this.brand = brand;
    }

    public String getRegistrationId() {
        return registrationId;
    }

    public void setRegistrationId(String registrationId) {
        this.registrationId = registrationId;
    }

    public Date getBuyDate() {
        return buyDate;
    }

    public void setBuyDate(Date buyDate) {
        this.buyDate = buyDate;
    }

    public String getModel() {
        return model;
    }

    public void setModel(String model) {
        this.model = model;
    }

    /**
     * CarFinder class. Contains methods to find cars from the database.
     */
    public static class CarFinder extends Model.Finder {

        CarFinder() {
            super(Car.class);
        }

        public EasyCriteria findByBrand(String brandId) {
            Brand brand = Brand.find.byId(brandId);

            return query().andEquals("brand", brand);
        }
    }
}
In both entities you have defined inner classes BrandFinder and a CarFinder, they extend a `Model.Finder` which gives you some predefined query methods and also exposes a simple query builder with which you can fluently build simple queries using static `find` property, for example, you can write: Car c = Car.find.byId(<id>).
2. Create a Controller and Actions
Now when you've got your domain model ready, it's time to define CRUD actions on top of the model.
2.1. Create a CarController class
So you're ready to create a CarController class which is just a container for your CRUD actions and you also want all your actions to be only available for site admins. Hopefully play-cms provides you such a functionality as a collection of controller annotations and as a PlayAuthApi with more fine grain authentication and authorization facilities.
Here you have a CarController with `RequiresBackendAccess` annotation which will prevent unauthorized access to all of the actions:
/**
 * Encapsulates a business logic tied to cars management
 */
@With({GlobalActionWrapper.class})
@RequiresBackendAccess
public class CarController extends Controller {

    private MessagesApi messagesApi;

    @Inject
    public CarController(MessagesApi messagesApi) {
        this.messagesApi = messagesApi;
    }

// Implemented CRUD methods are added here
}
2.2 Implement a list action
Now you can implement a `list` action to show a page with cars list:
/**
 * Prints a list with all cars with possibility to filter its data by brand/pagination
 * @param page - the number of current page
 * @param itemsPerPage - per page amount
 * @param brandId - used to filter data by brand
 * @return a page - the list of cars with pagination to render
 */
@Transactional
public Result list(int page, int itemsPerPage, String brandId) {
    PlayAuth.requirePermission(CarPermission.BROWSE);

    EasyCriteria cars;
    if (StringUtils.isNotEmpty(brandId)) {
        cars = Car.find.findByBrand(brandId);
    } else {
        cars = Car.find.query();
    }

    Paginate pages = new Paginate<>(cars, itemsPerPage);

    return ok(crud.views.html.list.render(pages, page, brandId));
}
Here you have used PlayAuthApi for more fine grain control on who can access this page. Also you've used a Car.find.findByBrand to get filtering by brand. Finally you wrapped a `cars` query with a Paginate class to get a paginated output.
2.3 Mapping URLs to action methods using routes
/server/conf/application.routes
# Example crud
GET      /admin/car/list                      crud.controllers.CarController.list(page: Int ?= 1, itemsPerPage: Int ?= 50, groupBrandId: String ?= "")
We can pass additional parameters in our list url like page number, items per page and brand Id. Construction "?=" means that our parameters are optional.
2.4 Template List View
Our list action returns rendered html page.
return ok(crud.views.html.list.render(pages, page, brandId));Template for it can be found /server/app/crud/views/list.scala.html. Optionally we can pass one of the 3 params
- brandId - if we want to filter by brand
- pages - page number
- page - items per page
In our template we define our parameters in that way
@(pages: ch.insign.commons.db.Paginate[crud.models.Car], pageNumber: Int, groupBrandId: String)and then we can use them in our html structure.
@pagination(pageNumber, pages.getPage(pageNumber), crud.controllers.routes.CarController.list(_, pages.getItemsPerPage, groupBrandId))Listing of our cars looks like
<table class="table table-striped table-bordered table-hover">
<thead>
<tr>
<th>@Messages("example.crud.car.id")</th>
<th>@Messages("example.crud.car.model")</th>
<th>@Messages("example.crud.car.brand")</th>
<th>@Messages("example.crud.car.registrationId")</th>
<th>@Messages("example.crud.car.price")</th>
<th>@Messages("example.crud.car.buyDate")</th>
<th>@Messages("example.crud.car.action")</th>
</tr>
</thead>
<tbody>
@Option(pages.getPage(pageNumber).getList).filter(_.nonEmpty).map { carList => @carList.map { item =>
<tr>
<td>@item.getId</td>
<td>@item.getModel</td>
<td>@Option(item.getBrand).map(_.getTitle).getOrElse(Messages("example.crud.car.no.brand"))</td>
<td>@item.getRegistrationId</td>
<td>@item.getPrice</td>
<td>@dateTimeSwiss(item.getBuyDate)</td>
<td>
@*
Prevent unauthorized users edit items
@see {href='https://confluence.insign.ch/display/PLAY/Play+Auth+-+View+Helpers}
*@
@hasPermission(CarPermission.EDIT(item)) {
<a title="Bearbeiten" href="@crud.controllers.routes.CarController.edit(item.getId)">
<i class="fa fa-edit"></i>
</a>
}
@hasPermission(CarPermission.DELETE(item)) {
<a data-toggle="modal" title="Löschen" href="#confirm-delete-@item.getId">
<i class="fa fa-trash"></i>
</a>
}
</td>
<tr>
@deleteModal(item)
}}.getOrElse {
<tr><td colspan="7">@Messages("example.crud.car.no.result")</td></tr>
}
</tbody>
</table>
As we use pagination in our example object pages contains our car list. getList function for current page returns it.
@Option(pages.getPage(pageNumber).getList).filter(_.nonEmpty).map { carList => @carList.map { item =>Variable item is of type Car. All public properties of this object are available in the template
<td>@item.getId</td>
<td>@item.getModel</td>
<td>@Option(item.getBrand).map(_.getTitle).getOrElse(Messages("example.crud.car.no.brand"))</td>
Good way to use optional values construction @Option() {...}.getOrElse{}. Instances of Option are either an instance of Some or the object None. So if we don't have any car in our list getOrElse block will be returned.
3. Create forms. Add/Update/Delete Entity.
3.1 Initialize a form
Forms are one of the main points of interaction between a user and a web site or application. They allow users to send data to the web site.
In Play-CMS you can easily define Form from Model class:
// Create Car form
Form<Car> form = SmartForm.form(Car.class);
This form can now be passed into the view template:
// Pass form to view
Html render = crud.views.html.edit.render(form, null);

// Protect the form from parameter tampering attacks.
Html html = SecureForm.signForms(render);
A note about security: Normally, you would of course not directly create a form object from a domain object but carefully map the properties you'd want to expose to the public in the form. To make form handling easier, we've introduced SecureForm which will add a signature to the form. The signature ensures that no fields can be added / modified on the client side. If you do not wish to use SecureForm, then you'll need to map your form and domain entity properties accordingly.
In CarController it would be just 2 lines of code:
Form<Car> form = SmartForm.form(Car.class);
return ok(SecureForm.signForms(crud.views.html.edit.render(form, null)));
Action which displays our form for adding a new car:
 /**
  * Initializes car form includes validation rules
  * @return edit template with secure form to render
  */
 @Transactional
 public Result add() {
     /**
      * Prevent unauthorized users to access this page.
      * @see {https://confluence.insign.ch/display/PLAY/Play+Auth+-
       +Authorization#PlayAuth-Authorization-ProtectingControllers}
      */
      PlayAuth.requirePermission(CarPermission.ADD);

      Form<Car> form = SmartForm.form(Car.class);

      /**
       * Protect the form from parameter tampering attacks.
       * @see {https://confluence.insign.ch/display/PLAY/Play+Commons#PlayCommons-SecureForm}
       */
       return ok(SecureForm.signForms(crud.views.html.edit.render(form, null)));
 }
and routing
GET /admin/car/add crud.controllers.CarController.add3.2 Form submit
To process submitted via Form data we should bind it to SmartForm:
Form<Car> form = SmartForm
    .form(Car.class)
    .bindFromRequest();
Play will validate the form and you can check this by:
if (form.hasErrors()) {
    return badRequest(SecureForm.signForms(crud.views.html.edit.render(form, null)));
}
Now all you have to is get Car object from form and save it:
Car car = form.get();
car.save();
Action to add a new car looks like
/**
 * Binds data from request, validate its data and if hasn't errors, persist its data to database
 * @return redirect to car list page if new car was saved or bad request, if something was wrong
 */
@Transactional
public Result doAdd() {
    PlayAuth.requirePermission(CarPermission.ADD);

    /**
     * Special class for our Forms: SmartForm. This class extends the normal form, but is much mightier.
     * @see {https://confluence.insign.ch/display/PLAY/Play+Commons#PlayCommons-SmartForm}
     */
    Form<Car> form = SmartForm
            .form(Car.class)
            .bindFromRequest();
    if (form.hasErrors()) {
        return badRequest(SecureForm.signForms(crud.views.html.edit.render(form, null)));
    }
    Car car = form.get();
    car.save();

    flash(AdminContext.MESSAGE_SUCCESS, messagesApi.get(lang(), "example.crud.car.add.successful.message", car.getModel()));

    return redirect(routes.CarController.list(1, Car.PAGINATE_DEFAULT, ""));
}
Routing
POST /admin/car/add crud.controllers.CarController.doAddRouting is the same but with POST request method.
3.3 Adding forms to our template
Of course to be able to create / update and so on you need to show your Form first. Here is an example of how you can use Forms in views:
@(carForm: Form[crud.models.Car], car: crud.models.Car)

@import ch.insign.cms.views.html.helpers.formKey
@import helper._
@import metronic.{metronicFieldConstructor, text}

@form(Option(car)
.map(_.getId)
.map(crud.controllers.routes.CarController.doEdit)
.getOrElse(crud.controllers.routes.CarController.doAdd), 'class -> "form-horizontal") {

@formKey()
...
}
3.4 Form helpers
Play-CMS provides a lot of helpers to display all types of HTML input fields:
Simple input text:
@metronic.text(
    carForm,
    "model",
    Messages("example.crud.car.model"),
    ""
)
Drop-down list:
@helper.select(
    carForm("brand.id"),
    options = Brand.find.all().map(brand => (brand.getId, brand.getTitle)).sortBy(_._2),
    'class -> "form-control select2me",
    '_label -> Messages("example.crud.car.brand")
)(FieldConstructor(metronicFieldConstructor.f), implicitJavaMessages)
Date-picker:
@metronic.datepicker(
    carForm,
    "buyDate",
    Messages("example.crud.car.buyDate"),
    "",
    (a: String) => a
)
Checkbox:
@metronic.textarea(
    editForm,
    "someTextarea",
    "Label of some textarea",
    "Placeholder",
    (a: String) => a,
    "Helper text"
)

@metronic.checkbox(
    editForm,
    "myCoolBooleanField",
    "MyCoolBooleanField label"
)
Textarea:
@textarea(
    editForm,
    "someTextarea",
    "Label of some textarea",
    "Placeholder",
    (a: String) => a,
    "Helper text"
)
Let's see example of form with helpers for our car object
@form(Option(car)
    .map(_.getId)
    .map(crud.controllers.routes.CarController.doEdit)
    .getOrElse(crud.controllers.routes.CarController.doAdd), 'class -> "form-horizontal") {

@formKey()

<fieldset @disabledIfLacksEditPermission >
    <div class="form-body">
	@if(Option(car).isDefined) {
	    <input type="hidden" name="id" value="@car.getId">
	}

	@text(
	    carForm,
	    "model",
	    Messages("example.crud.car.model"),
	    ""
	)

	@text(
	    carForm,
	    "registrationId",
	    Messages("example.crud.car.registrationId"),
	    ""
	)
  .............................
There are 2 input fields with name="model" and name="registrationId" will be displayed in our form.
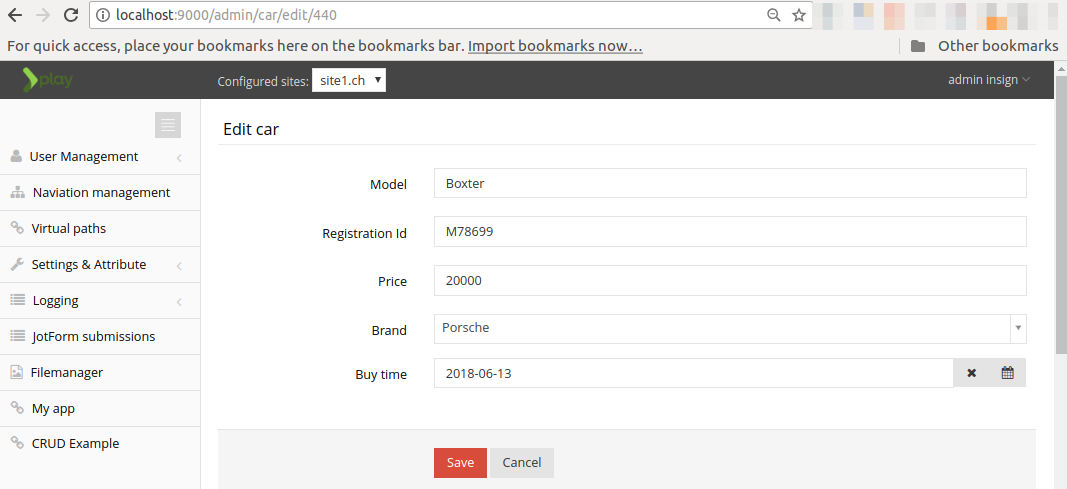
3.5 Update entity
To update existing entity you can pre-fill Form with Model and then use in view template as described before:
Car car = Car.find.byId(id);
if (car != null) {
    Form<Car> form = SmartForm
        .form(Car.class)
        .fill(car);
}
Update entity after form submit
//Action doEdit(String id)
Car car = Car.find.byId(id);
if (car == null) {
    return ch.insign.cms.utils.Error.notFound(messagesApi.get(lang(), "example.crud.car.notfound.message", id));
}
PlayAuth.requirePermission(CarPermission.EDIT, car);

Form<Car> form = SmartForm
    .form(Car.class)
    .fill(car)
    .bindFromRequest();
if (form.hasErrors()) {
    return badRequest(SecureForm.signForms(crud.views.html.edit.render(form, car)));
}
form.get().save();
3.6 Delete entity
And finally if you want to delete entity:
Car car = Car.find.byId(id);
if (car != null) {
    car.delete();
}
4. Integrating your application into cms
To learn more visit Integrating your application chapter.